



TL;DR:
- An AI escalation workflow routes interactions from AI to humans when low confidence or risk triggers occur, with full context preserved. The system relies on four layers: decision, orchestration, human queue, and audit, to scale reliably and maintain quality. Proper design emphasizes clear handoff payloads, strategic escalation criteria, routing, and continuous monitoring for effective deployment.
An AI escalation workflow is an orchestrated system that lets AI handle routine interactions while reliably routing complexity, risk, or low-confidence cases to humans with full context preserved. The minimal architecture has four layers: an AI decision layer (classification, confidence scoring, sentiment analysis), an orchestration engine (routing logic, timers, SLA enforcement), a human-in-the-loop queue, and an audit/logging layer. Get those four right, and you have a foundation that scales.
Gartner recommends combining AI augmentation with human oversight to maintain service quality and manage risk, which means the workflow is not just a technical artifact. It is an operational policy encoded in software. According to OutSystems, AI-driven workflow automation extends traditional rule-based automation by evaluating context, detecting patterns, predicting outcomes, and improving through feedback loops. That feedback loop is what separates a static routing script from a genuinely intelligent escalation system.
The core outcome you are designing for: zero context loss at handoff, deterministic SLA enforcement, and a tunable trigger layer that improves over time.
What this guide covers:
- How to decide your escalation policy (scope, channels, thresholds)
- Designing the pre-escalation flow and handoff payload
- Building routing paths, SLA timers, and trigger rules
- Testing, governance, and a Monobot implementation example
Start with Section 2 if you are defining strategy from scratch. Jump to Section 5 if you already have a flow and need to tune triggers. Go straight to Section 11 for the implementation checklist and DSL example.
Table of Contents
- How do you decide what to escalate, when, and through which channel?
- What should your AI do before handing off to a human?
- How do you build routing logic that gets cases to the right human fast?
- What context should you send with an escalation?
- How should the system behave after a human resolves a case?
- How do SLA timers and at-risk rules enforce response commitments?
- How do you test, monitor, and tune escalation rules over time?
- Who owns escalation governance, and what does the audit trail require?
- What does implementation look like, step by step?
- How does Monobot implement these escalation patterns in production?
- Key Takeaways
- The part most teams get wrong about escalation at scale
- Monobot gives your team a faster path to production-ready escalation
- Useful sources
- FAQ
How do you decide what to escalate, when, and through which channel?
Your escalation strategy is a business policy before it is a technical configuration. The goal is not to escalate as much as possible. It is to escalate exactly the right cases, at the right moment, to the right person, so your AI handles everything it can handle well and humans take over only where they add genuine value.
Define escalation goals tied to measurable outcomes:
- Reduce avoidable human load by keeping routine, high-confidence interactions fully automated
- Protect CSAT by catching frustrated or confused customers before they churn
- Manage regulatory and liability risk by flagging compliance-sensitive interactions for human review
- Detect repeated failure loops where the AI is cycling without resolution
Decision criteria for what to escalate:
- Complexity: Multi-step problems that require judgment, negotiation, or cross-system access
- Customer value: VIP or high-lifetime-value accounts that warrant white-glove handling
- Regulatory sensitivity: Interactions touching PII, financial disputes, healthcare data, or legal claims
- Loop detection: Three or more failed intent matches in a single session
- Sentiment and safety: Detected frustration, anger, or any language suggesting harm
Channel choice logic matters as much as the trigger itself. Synchronous channels (live chat, voice) support warm transfers when agents are available, which preserves conversational momentum. Asynchronous channels (email, ticketing) tolerate richer payloads and queued delivery, making them better suited for complex cases that need research time. Zendesk’s escalation configuration guidance recommends building explicit availability checks into your flow so the system falls back to email automation when no agent is online rather than leaving the customer in a dead queue.
Volume and capacity sanity checks are non-negotiable before you automate a routing path. If your contact center does not have the throughput data or feedback signals to validate AI performance on a given intent, that intent is not ready for automated escalation. Automate where you have evidence, not where you have hope.
Pro Tip: Start conservative. Automate low-risk routings first and measure your false-positive escalation rate, the share of cases the AI escalated that a human resolved in under 60 seconds with no additional information. A high false-positive rate means your thresholds are too sensitive, not that your AI is working hard.
What should your AI do before handing off to a human?
The quality of a handoff is almost entirely determined by what happens in the 30 seconds before it. An AI that escalates without preparation forces the human agent to start from scratch, which defeats the purpose of automation. Preserving conversation context and producing a short structured brief before handoff reduces agent rework and speeds resolution.
Handoff protocol
The structured handoff payload should include:
- A short problem statement (one to two sentences)
- Steps already attempted by the AI
- Current state variables (account status, open tickets, last transaction)
- Confidence score and the reason escalation was triggered
- Recommended next steps for the agent
- Conversation transcript attached to the ticket or workspace
Template: synchronous escalation message
Template: asynchronous ticket escalation
Subject: Escalated — [Intent Tag] — [Customer ID]
Summary: [One-line problem statement]
Attempted: [Steps tried]
State: [Relevant variables]
Priority: [Level]
Transcript: [Attached]
Checklist for flow design:
- [ ] Triggers defined with explicit conditions
- [ ] Fallback paths for unavailable agents
- [ ] Availability gating before synchronous escalation
- [ ] Escalation templates authored for each channel
- [ ] Post-escalation metadata fields mapped
- [ ] Both success and failure paths simulated before launch
The testing note here is practical: simulate a failure path where no agent is available during a synchronous escalation attempt. If your fallback is not configured, that case silently drops. That is the most common pre-launch gap teams discover only after go-live.
How do you build routing logic that gets cases to the right human fast?
Routing is where escalation strategy becomes operational reality. A well-designed routing layer gets the right case to the right agent in the shortest time, without ping-ponging the customer between queues. Ticket escalation best practices consistently flag ownership assignment as the single most important factor in preventing repeated transfers.
Routing dimensions to configure:
- Skill tags: Match cases to agents certified for the relevant product, language, or issue type
- Queues: Separate queues for tiers (Tier 1 general, Tier 2 technical, Tier 3 escalation specialists)
- Priority boosts: Automatically elevate priority for VIP accounts, SLA-at-risk cases, or safety flags
- Language and region: Route to agents who match the customer’s language and, where relevant, their US time zone or regional team
- Fallback rules: If no Tier 2 agent is available, queue to Tier 1 with an elevated priority flag rather than dropping the case
Availability handling and fallbacks:
- Check agent availability before attempting a synchronous transfer
- If no agent is available during business hours, create a ticket with full payload and notify the queue supervisor
- Outside business hours, route to asynchronous ticketing with an SLA timer that starts immediately
- Set a maximum retry count for synchronous escalation attempts before forcing asynchronous fallback
Ownership assignment is non-negotiable. Every escalated case must have a named owner the moment it enters the human queue. Workflows that leave ownership blank create the ping-pong effect where multiple agents touch a case without resolving it, and the customer repeats their story each time.
Escalation tiers work best when each tier has a defined scope, a maximum queue depth, and an automatic overflow rule. Tier 1 handles general inquiries; Tier 2 handles technical or billing complexity; Tier 3 handles regulatory, legal, or executive-level cases. Without overflow rules, Tier 2 becomes a black hole.
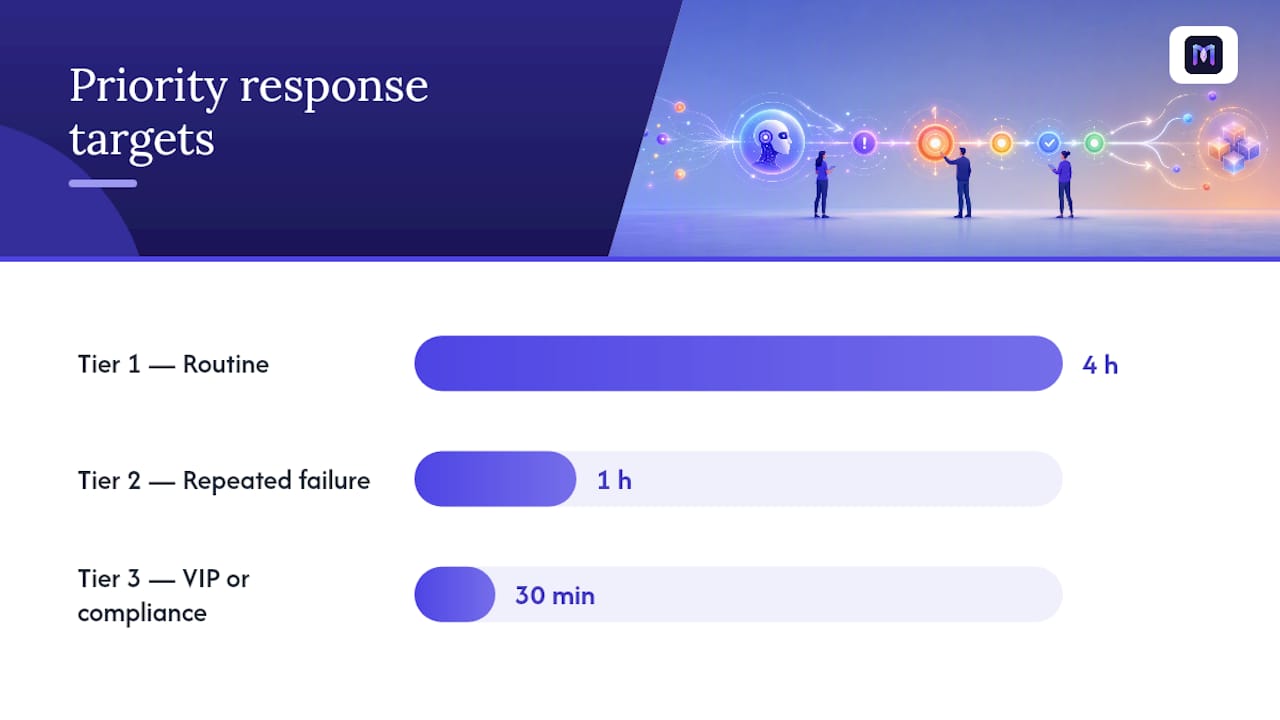
Priority tiers (example policy):
| Tier | Trigger | Target Response |
|---|---|---|
| 1 | Routine, confidence < 0.6 | 4 hours |
| 2 | Repeated failure, sentiment negative | 1 hour |
| 3 | VIP or compliance flag | 30 minutes |
| 4 | SLA breach imminent | — |
| 5 | Safety or legal flag | Immediate |
Map your synchronous and asynchronous paths separately, and mark exactly where SLA timers fire on each path. That diagram becomes your runbook.
What context should you send with an escalation?
The handoff payload is what separates a good escalation from a frustrating one. When an agent receives a case with complete context, they can act in seconds. When they receive a bare ticket number, they spend the first two minutes asking the customer to repeat everything. A structured brief at handoff directly reduces agent rework and improves resolution times.
Essential payload fields:
| Field | Description |
|---|---|
| Case ID | Unique identifier for the escalated interaction |
| User ID | Customer account or session identifier |
| Problem statement | One-to-two sentence summary of the issue |
| Steps attempted | List of AI actions already taken |
| State variables | Account status, open tickets, last transaction |
| Confidence score | AI confidence at the moment of escalation |
| Trigger reason | Which trigger fired and why |
| Timestamps | Session start, escalation trigger time |
| Recommended next steps | AI-generated suggested action for the agent |
Attachments and artifacts to include:
- Full conversation transcript
- Error codes and system logs
- Screenshots or screen recordings (for UI-based issues)
- Links to related open tickets
- Relevant system diagnostics or API response payloads
Delivery format: Send a quick summary card to the agent workspace for immediate triage, with the full transcript and attachments linked in the ticket. Agents should be able to act on the summary card alone for straightforward cases.
Data privacy: Only include fields permitted by your data governance policy. Mask or tokenize sensitive PII (Social Security numbers, full payment card data) before writing to the payload. US contact centers operating under CCPA or HIPAA have specific field-level restrictions that must be encoded in your payload template, not left to individual agent discretion.
Pro Tip: Have the AI generate a one-line “what I tried” summary as a mandatory pre-escalation step. Something like: “Attempted order status lookup (returned error 404) and knowledge-base suggestion for return policy (customer declined).” That single line cuts average triage time significantly.
How should the system behave after a human resolves a case?
Post-escalation behavior is where most workflow designs have gaps. The human resolves the case, closes the ticket, and the automation sits in an ambiguous state. Designing explicit on_human_complete handlers for every possible human outcome prevents stalled workflows and keeps your analytics accurate.
Three core outcomes to handle:
- COMPLETE: The human fully resolved the issue. Close the workflow, update the case record, and trigger any scheduled follow-ups (CSAT survey, debrief task).
- HANDOFF: The human needs to transfer to another agent or a different workflow. Route to the appropriate queue with the updated context payload.
- CONTINUE: The human completed a step but the automated workflow should resume (for example, after a human approves a refund, the AI processes it and sends confirmation).
Decision logic examples:
- If
human.resolved == true→ trigger COMPLETE, update SLA status to “resolved,” schedule CSAT survey in 24 hours. - If
human.needs_agent == true→ trigger HANDOFF to the specified queue with updated payload. - If
human.needs_followup == true→ trigger CONTINUE, assign a debrief task to the original owner. - If
human.outcome == nullafter timeout → trigger alert to supervisor, flag case for manual review.
Metadata updates on completion:
- Write resolution notes back to the case record
- Update final confidence and SLA status fields
- Apply resolution tags for analytics and model retraining
- Log the human action type and timestamp for the audit trail
Automated follow-ups to configure:
- CSAT survey sent 24 hours after COMPLETE
- Debrief task assigned to the agent for complex cases
- Automated remediation steps (refund processing, account update) triggered after human approval
Checklist for on_human_complete handlers:
- [ ] COMPLETE path defined and tested
- [ ] HANDOFF path defined with target queue specified
- [ ] CONTINUE path defined with resume point identified
- [ ] Null/timeout outcome handled with supervisor alert
- [ ] Metadata fields updated on all paths
- [ ] Follow-up automations configured and tested
- [ ] Stalled-state detection active (timeout after X hours without outcome)
How do SLA timers and at-risk rules enforce response commitments?
SLA enforcement is the operational backbone of any escalation system. Without it, cases drift, agents miss commitments, and customers escalate through social channels instead of your support queue. The percent-timer model is the most reliable pattern for US contact centers because it scales across case types without requiring separate timer configurations for each SLA tier.
At-risk vs. breach: the core distinction:
- At-risk: A proactive warning fired at 75–80% of the allotted SLA time. The goal is to give the owner time to act before a breach occurs.
- Breach: An action fired at 100% of SLA time. At this point, the system escalates automatically, bumps priority, and alerts management.
UiPath Maestro’s percent-timer model sets at-risk at approximately 80% and breach at 100%, with pause/resume support for cases waiting on external dependencies (third-party vendor response, customer callback).
SLA timeline example for a US contact center:
| Stage | SLA Target | At-Risk Action (80%) | Breach Action (100%) |
|---|---|---|---|
| Initial intake | — | Notify assigned agent | Escalate to Tier 2, alert supervisor |
| Tier 1 review | 1 hour | Notify agent + supervisor | Priority bump, reassign to senior agent |
| Tier 2 resolution | 4 hours | Notify Tier 2 lead | Escalate to Tier 3, management alert |
| Tier 3 settlement | 24 hours | Executive notification | Mandatory manual review, compliance flag |
Actions tied to SLA events:
- Notify the case owner via workspace alert and email
- Priority bump (increment priority level by one tier)
- Auto-reassign to a senior agent or supervisor if owner is unresponsive
- Management alert for Tier 3 and above breaches
- Compliance logging for regulated case types
Pause/resume rules: Suspend the SLA timer when a case is waiting on an external dependency (customer callback scheduled, third-party vendor response pending). Resume the timer the moment the dependency resolves. Never pause a timer without logging the reason and expected resume condition. Unlogged pauses are the most common source of SLA audit failures.
How do you test, monitor, and tune escalation rules over time?
A workflow that passes initial QA and then drifts is worse than one that never worked, because it creates false confidence. Testing and monitoring are not one-time activities. They are the operational loop that keeps your AI escalation system accurate as intents, volumes, and customer behavior change.
The operational tuning loop
Monitor metrics weekly for the first 90 days. When a metric drifts outside its target band, trace it to a root cause before adjusting thresholds. The loop:
- Monitor dashboards for metric drift
- Analyze root causes (specific intent, channel, time of day)
- Adjust trigger thresholds or routing rules
- A/B test the change against a control group
- Deploy to a canary population (5–10% of traffic)
- Validate metrics hold, then roll out fully
For regression testing guidance specific to AI agents, Monobot’s regression testing playbook covers intent routing verification, context payload integrity checks, and on_human_complete outcome validation.
Who owns escalation governance, and what does the audit trail require?
Governance is what keeps an escalation system trustworthy as it scales. Without clear ownership and audit controls, a single misconfigured trigger can route thousands of cases incorrectly before anyone notices. Enterprise AI workflows require a central orchestration layer to enforce consistent policy across systems, and that layer needs human owners.
Core roles:
| Role | Responsibility |
|---|---|
| Escalation Owner | Defines policy, approves threshold changes, owns SLA targets |
| Workflow Architect | Designs and maintains flow logic, routing rules, and payload schemas |
| Model Owner | Monitors confidence scores, manages model versions, and approves retraining |
| Operations Lead | Monitors daily metrics, manages agent queues, and handles incident response |
| Compliance Reviewer | Audits regulated case handling, reviews PII masking, and signs off on policy changes |
What to capture in the audit log:
- Decision inputs at the moment of escalation (intent, confidence score, sentiment score)
- Model version active at the time of the decision
- Trigger type and threshold values
- Routing target and actual destination
- Human actions taken and timestamps
- Resolution outcome and metadata updates
- Any threshold or routing changes with approver identity and timestamp
Retention guidance: US contact centers handling financial or healthcare interactions should retain audit logs for a minimum of seven years to satisfy federal recordkeeping requirements. General customer service logs typically require 12–24 months, but verify against your specific regulatory obligations.
Change control:
- All workflow changes must be versioned in source control
- Production updates require approval from the Escalation Owner and Compliance Reviewer
- Staged rollouts: canary (5–10%) → limited (25%) → full production
- Rollback plan documented before any deployment
Runbooks and training:
- Provide agents with a runbook for each escalation tier covering expected case types, required actions, and escalation criteria for further routing
- On-call rotation for critical escalations (Tier 4 and 5) with defined response SLAs
- Quarterly review of all trigger thresholds and routing rules against current performance data
Audit checklist (run quarterly):
- [ ] Permissions review: confirm role assignments match current team structure
- [ ] Model drift check: compare current confidence distributions against baseline
- [ ] SLA review: verify SLA targets still match business commitments
- [ ] Trigger review: confirm thresholds are calibrated to current intent performance
- [ ] Compliance review: verify PII masking and regulated-content handling are current
What does implementation look like, step by step?
Here is the practical sequence for standing up an AI escalation workflow in a US contact center, from scoping to scale.
Implementation checklist
- Inventory data sources: Map CRM, ticketing, order management, and knowledge-base systems. Identify which fields are available for payload population.
- Define triggers: Document each trigger type, condition, and threshold. Get sign-off from the Escalation Owner before building.
- Build pre-escalation actions: Configure identifier collection, diagnostic queries, remediation attempts, and summary generation.
- Author payload templates: Create structured payload schemas for each channel (synchronous and asynchronous). Include all required fields and PII masking rules.
- Create routing rules: Configure skill tags, queues, priority tiers, and fallback paths. Assign ownership rules.
- Configure SLA timers: Set at-risk (80%) and breach (100%) thresholds for each case type. Configure pause/resume rules.
- Write
on_human_completehandlers: Cover COMPLETE, HANDOFF, and CONTINUE outcomes. Include timeout/null handling. - Test all paths: Run the full test case suite (Section 9). Document results.
- Stage canary rollout: Deploy to 5–10% of traffic. Monitor key metrics for 7–14 days.
- Full rollout: Validate metrics, complete change-control documentation, and deploy to full production.
Typical timeline for a US contact-center pilot:
- Scoping and data inventory: 1–2 weeks
- Prototype (core triggers, one channel): 2–3 weeks
- Pilot (canary, limited intents): 4–6 weeks
- Scale (full intent coverage, all channels): 8–12 weeks
Example DSL/YAML: core escalation blocks
The following is an illustrative configuration showing the key structural elements of an escalation workflow. It is not a complete product configuration.
escalation_workflow:
  name: customer_support_escalation
  version: "1.0"

  triggers:
    - type: confidence_threshold
      condition: confidence_score < 0.6
      action: ESCALATE
      priority: tier_2

    - type: sentiment
      condition: sentiment_score < -0.4
      action: ESCALATE
      priority: tier_2
      tags: [frustrated_customer]

    - type: nlu_failure
      condition: consecutive_failures >= 3
      action: ESCALATE
      priority: tier_1
      tags: [loop_detected]

    - type: sla_at_risk
      condition: sla_elapsed_percent >= 80
      action: NOTIFY_OWNER
      priority_bump: true

    - type: sla_breach
      condition: sla_elapsed_percent >= 100
      action: ESCALATE
      priority: tier_3
      notify: [owner, supervisor, management]

  context_for_human:
    required_fields:
      - case_id
      - user_id
      - problem_statement
      - steps_attempted
      - state_variables
      - confidence_score
      - trigger_reason
      - timestamps
      - recommended_next_steps
    attachments:
      - conversation_transcript
      - error_logs
      - related_tickets
    pii_masking: enabled

  routing:
    default_queue: tier_1_general
    skill_match: true
    language_match: true
    fallback:
      condition: no_agent_available
      action: create_async_ticket
      sla_timer: start_immediately

  on_human_complete:
    COMPLETE:
      - update_case_status: resolved
      - update_sla_status: resolved
      - schedule_csat_survey: 24h
      - write_audit_log: true
    HANDOFF:
      - route_to_queue: specified_by_agent
      - update_payload: true
      - write_audit_log: true
    CONTINUE:
      - resume_automation: true
      - assign_followup_task: true
      - write_audit_log: true
    NULL_TIMEOUT:
      - alert_supervisor: true
      - flag_for_manual_review: true
Deploy to a canary population of 5–10% of traffic first. Watch escalation frequency, false-positive rate, and time to human response for at least seven days before expanding. A metric that looks fine in testing often behaves differently under real load distribution.
Integration connector points:
- CRM: write case records, read customer profile and history
- Ticketing system: create and update tickets, attach transcripts
- Observability platform: emit escalation events, trigger alerts, feed dashboards
For connecting AI classification and decision engines to CRMs and ticketing systems, Monobot’s automation flows documentation covers the integration patterns in detail.
How does Monobot implement these escalation patterns in production?
Monobot’s platform puts the architecture described in this guide into production without requiring custom code for the core escalation patterns. The AI Agent Builder, Automation Flows, and Workspace features map directly to the four-layer architecture: decision layer, orchestration, human queue, and audit logging.
Platform patterns Monobot supports:
- Pre-escalation checks: AI agents run identifier collection, CRM lookups, and knowledge-base suggestions before any escalation block fires. The agent generates a one-line summary card automatically.
- Escalation blocks: Configurable escalation triggers with confidence thresholds, sentiment detection, and loop detection built into the flow editor. No custom code required for standard trigger types.
- Availability gating: Business-hours checks and agent availability queries are native to the flow, with automatic fallback to asynchronous ticketing when no agent is online.
- Workspace handoff: When a case escalates, Monobot surfaces the structured summary card, conversation transcript, and recommended next steps directly in the agent workspace, so agents see everything they need without switching systems.
- CRM and ticketing integration: Monobot writes conversation transcripts, confidence scores, trigger reasons, and resolution metadata back to connected CRM and ticketing systems after every interaction.
Operational outcomes Monobot customers target:
- Higher automated handling rates by keeping AI in the loop for routine intents while escalating only where confidence or sentiment thresholds are crossed
- Reduced time-to-resolution through complete context delivery at handoff
- Improved first-contact resolution by equipping agents with AI-generated recommended next steps
Monobot’s Automation Flows let you configure the full escalation lifecycle, from trigger conditions and routing rules to
on_human_completehandlers, in a visual editor. That means your workflow architect can iterate on thresholds and routing logic without a deployment cycle for every change.
For IT helpdesk escalation use cases, Monobot’s IT helpdesk automation page shows how these patterns apply to technical support workflows. For teams scaling across voice and chat simultaneously, the AI Agent Builder is the recommended starting point for configuring escalation flows, triggers, and routing in a single interface.
Key Takeaways
A well-designed AI escalation workflow requires four layers, explicit trigger thresholds, a complete handoff payload, and deterministic post-escalation handlers to function reliably at scale.
| Point | Details |
|---|---|
| Four-layer architecture | Build an AI decision layer, orchestration engine, human-in-the-loop queue, and audit log before configuring any triggers. |
| SLA percent-timer model | Set at-risk notifications at 80% of SLA time and breach actions at 100%, with pause/resume for external dependencies. |
| Handoff payload completeness | Include case ID, problem statement, steps attempted, confidence score, and recommended next steps in every escalation payload. |
| Canary-first deployment | Deploy to 5–10% of traffic first and monitor escalation frequency, false-positive rate, and time to human response for at least seven days. |
| Monobot implementation | Monobot’s AI Agent Builder and Automation Flows cover trigger configuration, routing, availability gating, and on_human_complete handlers in a visual editor. |
The part most teams get wrong about escalation at scale
The conventional wisdom on AI escalation is that the hard part is the AI. Get a good model, set a confidence threshold, and the rest follows. That framing misses where most production failures actually occur.
The hard part is the handoff. Specifically, it is the gap between what the AI knows at the moment of escalation and what the human agent receives 30 seconds later. Teams invest heavily in classification accuracy and almost nothing in payload design. The result is agents who receive a ticket number and a vague intent label, then spend the first two minutes of every escalated call asking the customer to repeat themselves. That is not an AI problem. It is a workflow design problem.
The second underestimated failure mode is ownership. Escalation systems that do not assign a named owner the moment a case enters the human queue create the ping-pong effect, where the case bounces between agents, each assuming someone else is handling it. InvGate’s escalation documentation identifies this as the primary driver of poor escalation CX, and it is entirely preventable with a single routing rule.
The third trap is threshold rigidity. Teams set confidence thresholds at launch and never revisit them. Six months later, the model has improved on certain intents and degraded on others, but the thresholds are still calibrated to launch-day performance. The feedback loop described in the OutSystems architecture is not optional. It is the mechanism that keeps your escalation policy aligned with your model’s actual capabilities.
What actually works: invest in payload design first, assign ownership at the routing layer, and build the monitoring loop before you need it. The AI will improve. The workflow governance is what determines whether that improvement reaches your customers.
Monobot gives your team a faster path to production-ready escalation
Contact centers that build escalation workflows from scratch spend months on trigger logic, payload schemas, and routing configuration before they see a single live interaction. Monobot cuts that timeline by giving you a pre-built escalation architecture you configure rather than code.
The AI Agent Builder lets you define confidence thresholds, sentiment triggers, and routing rules in a visual editor. Automation Flows handle the pre-escalation checks, availability gating, and on_human_complete handlers without custom development. The agent workspace delivers the structured summary card and full transcript to your human agents the moment a case escalates, so they act immediately rather than investigate. And Monobot’s analytics layer tracks escalation frequency, false-positive rates, and CSAT post-escalation so you have the data to tune thresholds over time.
Whether you are running a contact center pilot or scaling across voice and chat simultaneously, Monobot’s industry templates for healthcare, retail, banking, and IT give you a starting point that reflects real escalation patterns. Schedule a demo or request escalation flow templates directly at monobot.ai.
Useful sources
The following sources informed this guide and are worth consulting directly for policy, architecture, and testing detail:
- Configuring escalation strategies and flows for AI agents — Zendesk Support
- What is AI-driven workflow automation? – OutSystems
- How to set SLAs and automated escalation rules — UiPath Maestro
- ServiceDesk Escalation automation documentation — Netgain Systems
- AI workflows: A guide to orchestrated, integrated automation – Celigo
- Ticket Escalation Explained: Types, Methods, Automation, and AI Tools — InvGate
- AI context escalation workflow — BrandJet Blog
- AI workflow automation — Appian blog
- AI-augmented service insights — Gartner
FAQ
What is an AI escalation workflow?
An AI escalation workflow is an orchestrated system that routes customer interactions from an AI agent to a human when the AI detects low confidence, negative sentiment, SLA risk, or a compliance flag, transferring full context at the moment of handoff.
What are the four stages of an AI workflow?
The four stages are data ingestion, AI model analysis (classification, confidence scoring, sentiment), orchestration (routing, timers, SLA enforcement), and human review with a feedback loop that feeds outcome data back to improve the model over time.
What triggers escalation in an AI system?
Common triggers include model confidence falling below a defined threshold (typically 0.6), repeated NLU failures in a single session, detected customer frustration, SLA timers reaching 75–80% of allotted time, and compliance or safety flags.
What is the 30% rule for AI?
The “30% rule” is not a standardized AI industry term. In escalation design, a related principle is to start by automating the lowest-risk 30% of your intent volume first, measure false-positive escalation rates, and expand automation incrementally based on performance data.
How do you prevent the ping-pong effect in escalation routing?
Assign a named owner to every escalated case the moment it enters the human queue, and configure routing rules that prevent automatic reassignment without a documented resolution step. Clear ownership at the routing layer is the single most effective control against repeated transfers.